Imagine waking up in the middle of nowhere, the sun warming your rooftop tent, and knowing your devices are charging thanks to the power of that very sun. Freedom on the road, untethered from power outlets – that’s the dream, isn’t it?
For overlanders and rooftop tent enthusiasts, the desire to stay connected and powered up while off-grid is real. The challenge is often finding solar solutions that are both effective and practical for their setup. Lugging around bulky solar panels or struggling with inadequate charging systems can quickly dampen the adventurous spirit.
This article aims to guide you through the world of solar chargers designed specifically for rooftop tents and overlanding vehicles. We'll explore the different types available, factors to consider when choosing the right one, and tips for maximizing their efficiency, ensuring you can enjoy the freedom of off-grid power without compromise.
Choosing the right solar charger for your rooftop tent or overlanding rig involves understanding the types of panels, considering your power needs, and knowing how to install and maintain your system. With careful planning and the right equipment, you can enjoy reliable, renewable power wherever your adventures take you, enhancing your off-grid experience and reducing your reliance on traditional power sources.
My First Solar Adventure: Lessons Learned
I remember my first overlanding trip vividly. The starry nights, the crackling campfire, the utter silence of the desert – it was magical. But then reality hit: my phone died, my camera battery was low, and my portable fridge was struggling to stay cold. I had brought a small, foldable solar panel, thinking it would be enough. It wasn't. The panel was too small, I hadn't positioned it correctly, and the charging was sporadic at best. It was a frustrating experience that taught me a valuable lesson: proper solar planning is crucial for successful off-grid adventures. It wasn't just about havinganysolar panel; it was about having therightsolar panel, sized appropriately for my power needs and installed in a way that maximized sun exposure. I ended up rationing my phone usage and cutting back on my fridge usage. I was able to get by, but it definitely put a damper on the experience. I vowed to learn more before my next trip. Since that first trip, I've invested in a larger, more efficient solar setup, and I've learned the importance of understanding my power consumption and choosing panels that can meet those needs. I've also learned the value of proper installation and maintenance, ensuring that my system is always performing at its best. Now, I can enjoy my off-grid adventures with the peace of mind knowing that I have reliable power whenever I need it.
Understanding Solar Chargers for Rooftop Tents
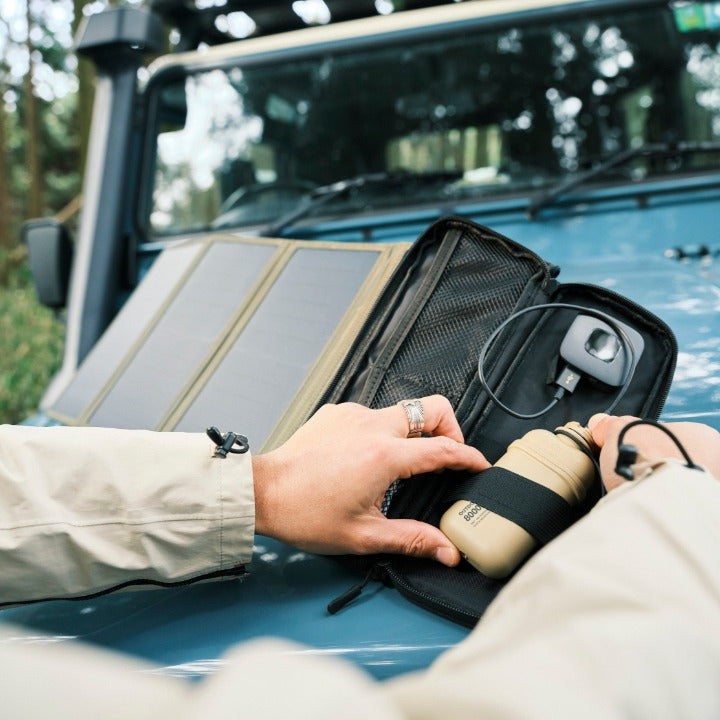
At its core, a solar charger for a rooftop tent is a system that converts sunlight into electricity to power your devices and appliances while you're off-grid. These systems typically consist of a solar panel (or multiple panels), a charge controller, and a battery (or a connection to your vehicle's battery). The solar panel captures sunlight and converts it into direct current (DC) electricity. The charge controller regulates the voltage and current flowing from the panel to the battery, preventing overcharging and damage. Finally, the battery stores the electricity for later use, allowing you to power your devices even when the sun isn't shining. There are different types of solar panels available, including monocrystalline, polycrystalline, and flexible panels. Monocrystalline panels are generally more efficient and more expensive, while polycrystalline panels are more affordable but slightly less efficient. Flexible panels are lightweight and can conform to curved surfaces, making them a good option for rooftop tents where space is limited. The size and type of solar panel you choose will depend on your power needs and your budget. If you only need to charge small devices like phones and cameras, a smaller panel might suffice. But if you want to power larger appliances like refrigerators or laptops, you'll need a larger, more powerful panel.
The History and Evolution of Overlanding Solar
The concept of using solar power for mobile applications isn't new. Early iterations date back to the space race, where solar panels were crucial for powering satellites. As technology advanced and costs decreased, solar began to trickle down into consumer applications. Early overlanders were pioneers, adapting existing solar technology to their rugged needs. These systems were often bulky, heavy, and not particularly efficient, but they represented a first step toward energy independence on the road. There's a common myth that solar is only effective in perfectly sunny conditions. While direct sunlight is ideal, modern solar panels can still generate power on cloudy days, albeit at a reduced rate. Furthermore, advancements in battery technology have significantly improved the ability to store solar energy for later use. This means that even if you have a few days of overcast weather, you can still rely on solar power to keep your devices running. Today, we have access to a wide range of solar solutions specifically designed for overlanding and rooftop tents. These systems are more compact, lightweight, and efficient than ever before, making it easier than ever to enjoy the benefits of solar power on your adventures. The integration of MPPT (Maximum Power Point Tracking) charge controllers has also significantly improved efficiency by optimizing the power transfer from the solar panel to the battery, which continues to evolve and innovate, which promises to be a pivotal role in a cleaner and self-reliant adventure future.
Unlocking the Hidden Potential of Your Solar Charger
One of the often-overlooked secrets to maximizing your solar charger's potential is understanding its power curve. Solar panels don't produce power at a constant rate throughout the day. Their output peaks around midday when the sun is directly overhead and gradually decreases as the sun moves across the sky. Knowing this can help you optimize your energy usage. For example, you might want to schedule your heaviest power consumption for the middle of the day when your solar panel is producing the most electricity. Another hidden secret is proper panel maintenance. Dust, dirt, and debris can significantly reduce the efficiency of your solar panel. Regularly cleaning your panel with a soft cloth and water can help maintain its performance. Avoid using harsh chemicals or abrasive cleaners, as these can damage the panel's surface. Furthermore, be mindful of shading. Even partial shading can drastically reduce a solar panel's output. Make sure your panel is positioned in a location where it will receive direct sunlight throughout the day, and avoid placing it near trees, buildings, or other objects that might cast a shadow. Investing in a quality charge controller is also essential. A good charge controller will not only protect your battery from overcharging but also optimize the power transfer from the solar panel to the battery, maximizing efficiency. Modern MPPT charge controllers can significantly improve the performance of your solar system, especially in suboptimal conditions.
Top Solar Charger Recommendations for Overlanders
When it comes to recommending specific solar chargers for overlanders, it's important to consider individual needs and budgets. However, some standout options consistently receive high praise. For flexible solar panels, the Renogy 100W Flexible Solar Panel is a popular choice. It's lightweight, easy to install, and provides decent power output for its size. It can conform to the curved surfaces of a rooftop tent or vehicle roof, making it a versatile option. For more robust and higher-power setups, consider rigid solar panels from brands like Zamp Solar or Go Power! These panels are typically more durable and efficient than flexible panels, but they're also heavier and more expensive. They're a good choice if you have more space and need to power larger appliances. When it comes to charge controllers, Victron Energy is a top-tier brand known for its high-quality and reliable products. Their MPPT charge controllers are highly efficient and offer advanced features like Bluetooth connectivity and remote monitoring. For portable power stations that integrate solar charging, the Goal Zero Yeti series is a popular option. These power stations combine a battery, charge controller, and inverter into a single unit, making them easy to use and transport. They can be charged via solar panels, AC power, or DC power, providing a versatile power solution for overlanders. Ultimately, the best solar charger for you will depend on your specific needs and budget. Do your research, read reviews, and consider your power consumption before making a decision.
Understanding Solar Panel Types: Flexible vs. Rigid
Choosing between flexible and rigid solar panels is a key decision when setting up your overlanding solar system. Flexible panels, as their name suggests, are designed to bend and conform to curved surfaces. This makes them ideal for mounting on rooftop tents or vehicle roofs where rigid panels might not fit. They're also lightweight, which can be a significant advantage for overlanders who are concerned about weight restrictions. However, flexible panels are generally less efficient and less durable than rigid panels. They're more susceptible to damage from flexing and can degrade more quickly over time. Rigid panels, on the other hand, are more efficient and more durable. They're typically made from monocrystalline or polycrystalline silicon and are encased in a protective frame. They're also less expensive per watt than flexible panels. However, rigid panels are heavier and cannot be bent or flexed. This makes them less suitable for mounting on curved surfaces. The best choice for you will depend on your specific needs and priorities. If weight and flexibility are paramount, flexible panels might be the way to go. But if you prioritize efficiency and durability, rigid panels are a better option. Some overlanders even choose to combine both types of panels, using flexible panels for hard-to-reach areas and rigid panels for larger, flat surfaces. This allows them to maximize their solar power generation while taking advantage of the unique benefits of each type of panel.
Essential Tips for Optimizing Your Solar Charger's Performance
Maximizing the performance of your solar charger involves more than just buying the right equipment. Proper installation, maintenance, and usage habits are also crucial. First and foremost, ensure that your solar panel is installed in a location where it will receive direct sunlight throughout the day. Avoid placing it near trees, buildings, or other objects that might cast a shadow. Even partial shading can significantly reduce a solar panel's output. Secondly, regularly clean your solar panel with a soft cloth and water. Dust, dirt, and debris can accumulate on the panel's surface, reducing its efficiency. Avoid using harsh chemicals or abrasive cleaners, as these can damage the panel's surface. Thirdly, understand your power consumption. Before you even purchase a solar charger, calculate how much power you'll need to run your devices and appliances. This will help you choose the right size solar panel and battery. Fourthly, conserve energy. Turn off devices when you're not using them, and use energy-efficient appliances. This will help you extend the life of your battery and reduce your reliance on solar power. Fifthly, monitor your system's performance. Use a charge controller with a built-in display or Bluetooth connectivity to track your solar panel's output and your battery's charge level. This will help you identify any problems and make adjustments as needed. By following these tips, you can optimize the performance of your solar charger and enjoy reliable, renewable power on your overlanding adventures.
Maximizing Battery Life with Proper Charge Control
The charge controller is the unsung hero of your solar power system. It's responsible for regulating the voltage and current flowing from the solar panel to the battery, preventing overcharging and damage. Overcharging can significantly reduce the lifespan of your battery, so it's essential to have a high-quality charge controller that is properly configured. There are two main types of charge controllers: PWM (Pulse Width Modulation) and MPPT (Maximum Power Point Tracking). PWM charge controllers are less expensive but also less efficient. They simply connect the solar panel directly to the battery, which can result in wasted energy. MPPT charge controllers, on the other hand, use a more sophisticated algorithm to optimize the power transfer from the solar panel to the battery. They can increase the charging efficiency by as much as 30%, especially in suboptimal conditions. When choosing a charge controller, make sure it's compatible with your battery type. Different battery types (e.g., AGM, lithium-ion) require different charging voltages and currents. Also, consider the charge controller's amperage rating. It should be able to handle the maximum output of your solar panel. Investing in a high-quality MPPT charge controller is one of the best things you can do to maximize the performance and lifespan of your solar power system. It will not only protect your battery from overcharging but also optimize the power transfer from the solar panel to the battery, ensuring that you get the most out of your solar energy.
Fun Facts About Solar Power and Overlanding
Did you know that the amount of solar energy that strikes the Earth in one hour is enough to power the entire world for a year? It's a staggering amount of energy, and it highlights the immense potential of solar power. Here's another fun fact: the first solar-powered car was built in 1955 by William G. Cobb. It was a miniature car with 12 solar cells that could reach a top speed of just one mile per hour. While it wasn't exactly practical, it demonstrated the feasibility of solar-powered transportation. For overlanders, solar power offers a unique sense of freedom and self-sufficiency. It allows you to travel to remote locations without having to rely on traditional power sources. You can wake up in the middle of nowhere, surrounded by nature, and still have the power to charge your devices, run your refrigerator, and even brew a cup of coffee. Solar power also helps reduce your environmental impact. By using renewable energy, you can minimize your carbon footprint and contribute to a more sustainable future. Furthermore, solar power can save you money in the long run. While the initial investment in a solar power system can be significant, it can pay for itself over time by reducing your reliance on expensive propane or generator fuel. So, whether you're a seasoned overlander or just starting out, consider adding solar power to your setup. It's a fun, practical, and environmentally friendly way to enhance your adventures.
How to Install Your Solar Charger on a Rooftop Tent
Installing a solar charger on a rooftop tent can seem daunting, but with the right tools and a bit of planning, it's a manageable DIY project. The first step is to determine where you want to mount the solar panel. Ideally, you want a location that receives direct sunlight throughout the day and is free from obstructions. Consider the weight and size of the panel, and make sure the tent's frame can support it. Next, you'll need to attach the solar panel to the tent's frame. There are several ways to do this, depending on the type of panel and the construction of your tent. Some flexible panels come with adhesive backing, which makes installation relatively easy. Simply peel off the backing and stick the panel to the tent's roof. For rigid panels, you'll need to use brackets or mounting rails to attach the panel to the frame. Make sure the brackets are sturdy and can withstand the vibrations of driving. Once the panel is mounted, you'll need to run the wires from the panel to the charge controller. Choose a route that is protected from the elements and won't be damaged by rubbing or chafing. Use cable ties or clamps to secure the wires along the way. The charge controller should be mounted in a dry, well-ventilated location, ideally inside the vehicle. Connect the wires from the solar panel to the charge controller, following the manufacturer's instructions. Then, connect the charge controller to the battery, again following the manufacturer's instructions. Finally, test the system to make sure everything is working properly. Use a multimeter to check the voltage and current at various points in the system. If everything checks out, you're ready to start enjoying the benefits of solar power on your rooftop tent adventures.
What if My Solar Charger Isn't Working? Troubleshooting Tips
Even with the best equipment and careful installation, solar chargers can sometimes experience problems. If your solar charger isn't working as expected, don't panic. There are several troubleshooting steps you can take to identify and resolve the issue. First, check the obvious things. Make sure the solar panel is clean and free from obstructions. Check the wiring connections to make sure they're secure and corrosion-free. Check the charge controller to make sure it's properly configured and that the fuses are intact. If everything looks good on the surface, use a multimeter to check the voltage and current at various points in the system. Start by checking the voltage at the solar panel terminals. If you're getting a reading of around 18-20 volts in direct sunlight, the panel is likely working properly. Next, check the voltage at the charge controller input terminals. If you're not getting any voltage there, there's likely a problem with the wiring between the panel and the charge controller. Then, check the voltage at the charge controller output terminals. If you're getting a reading of around 13-14 volts, the charge controller is likely working properly. Finally, check the voltage at the battery terminals. If the voltage is low, the battery may be discharged or damaged. If you're still having trouble, consult the manufacturer's documentation or contact a qualified electrician. They can help you diagnose the problem and recommend a solution. Remember, safety first. Always disconnect the solar panel from the charge controller and the battery before working on the electrical system.
Top 5 Solar Chargers for Rooftop Tents & Overlanders
Here's a quick listicle of some top-rated solar chargers frequently recommended for rooftop tent and overlanding setups:
- Renogy 100W Flexible Solar Panel: Lightweight and adaptable, perfect for curved surfaces.
- Zamp Solar Legacy Series: Rugged and efficient rigid panels for higher power needs.
- Goal Zero Yeti Power Stations: Integrated battery, inverter, and charge controller for ease of use.
- Victron Energy Smart Solar MPPT Charge Controller: High-efficiency charging with Bluetooth monitoring.
- Sun Power Flexible Solar Panels: Known for their high efficiency and durability in a flexible format.
Remember to research thoroughly and consider your power requirements before making a purchase. User reviews and expert opinions can provide valuable insights. Consider also if you plan to expand your power needs in the future.
Question and Answer
Q: How much solar power do I need for my rooftop tent setup?
A: This depends on your power consumption. Calculate the wattage of all the devices you plan to run (phones, laptops, refrigerators, etc.) and estimate how many hours per day you'll use them. This will give you an idea of your daily power needs. Then, choose a solar panel and battery that can meet those needs.
Q: Are flexible solar panels as efficient as rigid panels?
A: Generally, no. Flexible panels tend to be less efficient than rigid panels. However, they offer the advantage of being lightweight and adaptable to curved surfaces.
Q: Can I leave my solar charger connected to my battery all the time?
A: Yes, as long as you have a charge controller. The charge controller will prevent the battery from overcharging.
Q: How often should I clean my solar panel?
A: Regularly, especially if you're traveling in dusty or dirty conditions. Cleaning your solar panel with a soft cloth and water will help maintain its efficiency.
Conclusion of Solar Chargers That Fit on Rooftop Tents & Overlanders
Investing in a solar charging system for your rooftop tent or overlanding vehicle unlocks a new level of freedom and self-sufficiency. By understanding your power needs, choosing the right equipment, and following best practices for installation and maintenance, you can enjoy reliable, renewable power wherever your adventures take you. Embrace the sun, power your journey, and experience the ultimate off-grid experience.